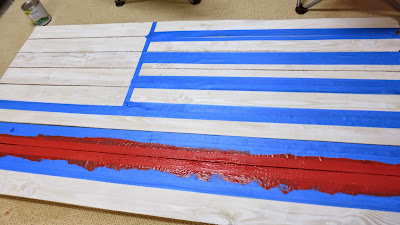
This project was so intimidating to me. Probably the most intimidating project I've ever tried. How was I going to build the flag? How would I paint even lines? Where would I get a star stamp the right size? How would I stain it?!!!! If you feel the same way, rest assured that if I can do it, you absolutely can too. This could easily be made using pallet boards, but I'm not into tearing yucky boards with rusty nails apart, only to be surprised by termites in my house later. I went to Home Depot and bought picket fence boards...only $1.08 each! I bought three 36-inch stakes for the back (I think these were around $0.57).
My original plan was to cut the 6 ft picket boards down, and get rid of the tips on the ends, but once I had them all together I kind of liked the way it looked. It reminded me of the end of a flag waving. When you attach the stakes to the boards (I used #6 x 1" wood screws) make sure you have it flipped backwards, because when you turn it over, you want the "wavy edges" to be on the right.
I painted the whole flag white so I wouldn't have to tape off and paint red stripes and then white stripes. This saved me a step. Since I wanted my end product to look aged and rustic, I only white-washed the flag instead of painting it a solid white (for those that don't know, whitewash is just watered down white paint).
I'm not paid to do product placement, but I had to share a picture of this Shur-Line pack. It was amazing! Just what I needed to paint the stripes. I didn't want to use a paintbrush, because the wood was so rough that the painter's tape wasn't sticking perfectly. I didn't want the paint to bleed under the tape. This pack was an enormous help!
The American flag has thirteen stripes, so you have to divide your flag into 13. An easy task in theory... I ended up leaving my bottom stripe a little bigger than the rest to make measuring easier. The blue field is a little less than 1/3 the width of the flag.
Make sure you apply the paint starting on the tape and swiping inwards, do not start in the middle of the stripe and brush out...you will get all kinds of paint under the tape.
And even if you are super careful, you will probably have a few mistakes that have to be tweaked later.
Anyone see my mistake below? I ended the blue field on a red line...it has to end on a white line. I tried to live with it, but I couldn't. After this point I had to go buy more boards, re-whitewash, re-tape and repaint! I was not a happy camper, but my OCD was:)
I was so worried the whole time about how I would do the stars. I looked for stamps, stencils, etc. I couldn't find what I needed. I bought a cheap pack of wooden stars (probably less than $3) at JoAnn Fabrics and tried out the different sizes to see what worked best for me. After I chose a size, I cut out lots of the same stars on paper and placed them on the flag so I could double check their size.
But what to do about a stamp?! There was no way I could paint those stars by hand, a stencil would bleed through and a sponge would leave paint bubbles! I bought a 6mm foam sheet and used my wood piece for a template. I tried to cut out the star with scissors repeatedly before switching to a razor blade - much better!
Then I used Gorilla glue to glue on a wooden cut out that was the same size, and another one over that so I could have something to easily grab.
TaDa!
Trial and error came into play here. My first three stars had way too much paint on the stamp and did not look good at all! So I wiped them off, used way less paint and tried again. Since I was going for a rustic look/feel, I was fine with my stars being spotty and imperfect.
Phase 1 - complete!
In order to get the rustic look I was going for, I took my sander to it....repeatedly! It was slightly terrifying. After all my hard work, there I was messing it up. It did give me exactly the look I wanted though.
Here is Little Man showing off his new flag! I wanted to show how big it actually is. Little man is 3 feet tall (at least he was. I should probably measure my growing boy more often). This is hanging in his new big-boy room (a work in progress). The theme is All American Boy, but since the furniture will be dark walnut this was just too bright and light to match.
I wanted to darken/age/rough it up, but was super nervous about what to use: stain, wax.....Agh! Too many choices! Someone recommended Old English scratch cover, and I had also seen it used on Pinterest. It was perfect. Though I will say easy does it. Go slow. Wear gloves so it doesn't stain your skin/nails! I dabbed the cloth in the Old English and dabbed/rubbed it on and then wiped it off. It gave me exactly the look I was going for.
Finished! I'm so happy my All-American boy will grow up playing and sleeping with Old Glory flying over him.


