Tuesday, December 2, 2014

Mistle"toes"

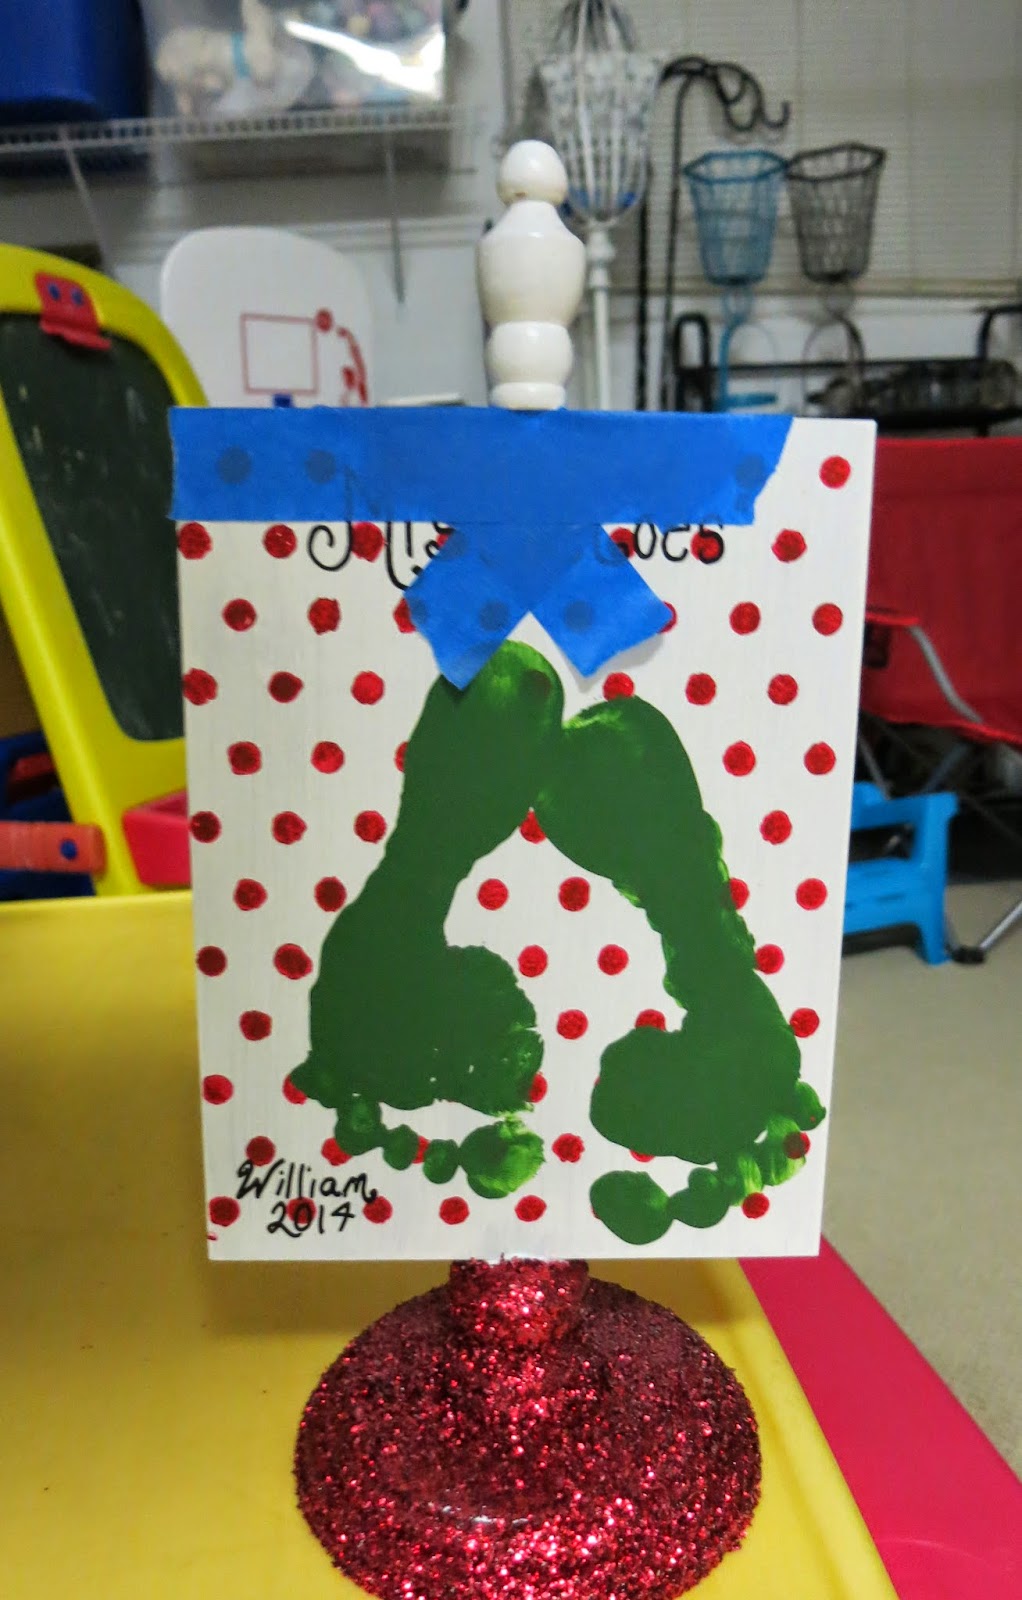
I'm betting you have seen the mistle"toe" foot print craft all over Pinterest. Well, here's another one, but with my spin on it.


If you want to do it exactly like I did, here's what you'll need:
Table Sign 
Spray paint
Acrylic craft paint
Glitter
Elmer's spray adhesive
Hot glue gun
Ribbon
Jingle Bells
Paint Brushes
Stencil
Wire
Clear nail polish (I'll explain)

I was strolling through Hobby Lobby looking for inspiration, and I found unfinished wood table signs. Perfect! I also grabbed some unfinished wooden picture frames (easier to ship) for out-of-town grandparents. I didn't think to take a picture of the blank table sign...oops!

First I trimmed the back of the frames with painter's tape so the spray paint wouldn't bleed onto the back (it didn't stop it completely, but oh well)
Then I spray painted, but I didn't realize how unfinished wood sucks up paint. It's like a sponge! I had to go over it with a paintbrush. Once it was sufficiently coated white, I taped my stencil on with painter's tape and used a sponge brush to apply my acrylic paint. (I had to share my craft space with a somewhat meddlesome, little coworker)


Once my paint was dry, I taped around the bottom  of the pedestal. Then I coated it with Elmer's adhesive spray and sprinkled with glitter. If you find a non-messy way of doing this, PLEASE tell me. I noticed that the glitter kept falling off after that, and so I decided to spray again with glue after the glitter was applied. Unfortunately, it did dull the shine a bit, but I'd rather have dull glitter than patchy, bald spots of glitter.  


Then I recruited help for the footprints. I was the most nervous about this step, because two year old boys are known to be rambunctious and unpredictable. I need not have worried. Little Man did splendidly! He thought it tickled, and I gave him a huge lollipop to distract him.
* Helpful hint* I put him in his booster seat (so he couldn't run away), and I used a plastic bag to shield the chair from the paint. 


After  the paint dried (again), I taped off the top decorative piece and painted it with metallic, gold, acrylic paint. Also, I used a black paint pen for the lettering. 


Relax you're almost done! Here's the last step: Make a bow around a piece of wire. After you've made the bow, string the bells onto the wire, twist closed and snip the excess. 


After you've got the bow just the way you want it, use clear nail polish to keep the ends of the ribbon from unraveling. Once that is done, use a hot glue gun to secure the bow in place. 


Viola! Here are the finished products of Little Man's Christmas craft! 


Wednesday, October 29, 2014

Zizzle Zazzle Personalized T-shirt Giveaway


For his 2nd birthday my Little Man shared his Elmo themed birthday party with his great-grandma. I knew I wanted to get him a personalized shirt for the occasion, and Zizzle Zazzle had just what I needed. I ordered my iron-on decals for his shirt, and spoke with the shop owner, and she made me a customized 70th decal for great-grandma. I loved it! I did my best to get a clear picture of the birthday boy and girl in their matching shirt's, but Little Man just wouldn't cooperate.

How cute are they?!!!

Here's a clearer shot of the shirt, but his face is kinda fuzzy:( 


ZizzleZazzle is giving away one T-SHIRT WITH PERSONALIZED DECAL, and you will not believe the selection you can choose from: Frozen, Cars, Princess Sofia, Jake and the Neverland Pirates, Monsters Inc., CareBears, etc...16 pages of options to choose from!!! Hurry and enter the giveaway! your birthday boy or girl will love it!

Personalized T-Shirt from Zizzle Zazzle

Sunday, October 5, 2014

Nannie's Quiet Book

Full Disclosure* This is my mom's DIY project. I freely admit that she is the Master DIYer, but this was just too great a project not to share. She presented it to him for his 2nd birthday:) 

Unfortunately, since this wasn't my project, I didn't take pictures of the steps along the way, but at least you can glean inspiration from the finished project, If you have a question about anything in particular, leave me a comment, and I will do my best to get an answer from her for you. I am including links to the end of the post for some of the sites she visited for ideas. 

Warning! She said she thought this would a weekend project, but it took weeks. These take time. 

I present to you, a labor of love....
 Book cover courtesy of Mom's embroidery machine. 


The first page featured a mirror covered by hand embroidered life-size hands. Perfect for playing peekaboo with yourself. Not gonna lie, Little Man quite likes to admire his reflection. So this page is a big hit.
 Super cool idea, huh?

Next on the list, the farm pages. Not only are these super cute with a functioning barn door, they are (again) hand embroidered, and magnetic! 

 I'm posting a close-up so you can see the amazing detail that was put into every piece, 

Count along with the movable beads! 

This is so super cute, and I just love it! In the pocket are various accessories Little Man can use to change his look. 

I especially like the Miami Marlins hat. Go Fish! 

At last, the whole reason for this project! Little Man really really loves this page. It's amazing to have during church! 


Left: Page has a movable boat (pull the ribbon either way), and it is even christened after Little Man himself. 
Right: This page features snaps and a zipper for motor skill development. Oh, yah, it's super cute too.  

I feel like these two pages are the highlight of the book. They show amazing skill and dedication. It's stunning. First, you have a fish net to contain the hand-embroidered finger puppets and a marine background on the opposite side. 

Wait until you see the close-up shots of the puppets! 

This yellow submarine has windows! Somehow, she used clear plastic to create actual portholes. I wish they had shown up in the pictures though.
 This squid is one of my favorites! It so groovy! 
 Seagull with fish in his beak. 
 Maybe the most detailed of all. Look at all that embroidery! 

Another stunning set. Where to start: the button wheels that can be put on and taken off, the opening door, the finger puppets?! There's simply too much! 
 Check out that mane! Like, Seriously! 

The last page has movable automobiles for my car obsessed son. 
Just pull the ribbons either direction to move them.

My husband works for UPS, and she made a "Daddy's Truck", as it is known around our house, for Little Man. It even has a real "glass" door! 

This says it all. Thank you so much, mom, for this amazing keepsake. 

Nannie (as he calls her), Little Man & Pawpa checking out his birthday book! 

Links for ideas: 
http://rigierukodelki.blogspot.com/2012/04/blog-post_04.html#more 
http://tom-toy.blogspot.co.il/2014/06/quiet-book-for-annabelle.html
http://www.imagineourlife.com/2011/09/27/circus-train-quiet-book-page/
http://bugsandfishes.blogspot.com/2014/06/guest-post-felt-ocean-finger-puppets.html
http://www.sewcando.com/2009/09/quiet-time-part-2-quiet-books-abound.html
http://homemadebyjill.blogspot.com/p/templates-printables.html


Tuesday, September 16, 2014

~Come Home Safe~ Door Decal Giveaway

So, I'm innocently scrolling through my Facebook feed the other day when out of nowhere...Wham! 


Someone I follow shared a picture of an etsy listing for a door decal from Imprinted Decals. I was blown away! It wasn't flashy or anything. It was quite simple really, but what it said resonated with me. My husband works for UPS, and is on the road much of the time. When he leaves for work in the mornings or when I'm hanging up the phone, my parting words to him are almost always, "Be safe." When I saw this I just knew it was the reminder our family needed to see when we leave the safety of home. I want each of us to see it and remember to be careful, because we have people at home who love them and would be lost if they went away.

I ordered my decal from Imprinted Designs, and asked if they would be interested in collaborating on a giveaway for Family, Faith and DIY's followers. I spoke with Jennifer, and she was super helpful and nice. Not only are they giving away one of these amazing decals, but they are letting YOU choose the color. Now, how's that for awesome?  

I just wanted to show you how it turned out for me. I couldn't put this on my front door because of the way the door is designed. I put it on our garage door (which is the one we use most of the time anyways). 

First you get in in the right place...I double checked with a level to be certain it was straight. Then rub the decal on with a credit card. 

Next, carefully peel away the backing, I find that pulling diagonally works best for me. 

I couldn't be happier with the results! I'm thrilled with this little reminder. I love the color "Stormy Grey" too. It just makes this house even homier to me. Don't foget to enter the giveaway below! Contest ends on October 1, 2014.

~Come Home Safe~ Door Decal

Tuesday, August 26, 2014

Indoor "Garden" Party

Little Man invited some of his friends over for a play date today. Unfortunately, it is simply too hot here in South Florida for outdoor play right now, and it can be a bit boring for toddlers to play inside. So, I decided to have a little fun with it. The guests were asked to wear party attire (out of respect for their privacy the guests aren't in the pictures or their faces are hidden), I moved all the furniture out of the way and set up a kid-friendly Indoor "Garden" Party.
I don't think Little Man knew what to do with himself. He has never seen his house so topsy-turvy., but he liked it.
Here he is the morning of (in his mismatched jammies) enjoying the chaos. 

Just because the heat or rain or maybe even snow keeps you inside, it doesn't mean you have to settle for ordinary. I did my best to make a little play Utopia for them with what I had on hand...and at my parent's house. I set up a picnic table, reading area with books and a puzzle, a pillow pool, car mat area, crawl through bus and tunnel, teeter totter, tea set (one of the guests brought this for the party and it was a huge hit! It was a Leap Frog product, and if I had a girl, we would be getting one).  Fun was all around. 


The first guest was Skinny Latte Mommy's little Miss Cupcake. She and my Little Man are very good little friends. 


(Little Man really liked the tea set:)) 

Then we had to break for snack time. Skinny Latte Mommy brought a healthy, homemade snack for the kiddos...only four ingredients. Check out the recipe here. They are beautiful and I requested she leave a few behind for Little Man's snacking pleasure. 

Too bad these mommies never stop blogging and feed their kids, right? Haha! 

It was a lot of fun to do something different and unexpected. I think/hope everyone had a lovely time. I certainly did. 

Do you have any indoor play date ideas that you would like to share? I'd love to hear them!