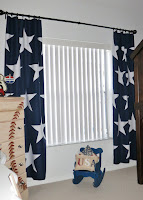
While searching Pinterest for inspiration for Little Man's All American Boy Room I stumbled upon a picture of star curtains by The Yellow Cape Cod. Click here to see her post. I fell in love with them! I searched online to see if I could buy something similar, but I couldn't find anything I liked as much. I cannot sew, and these were a semi-DIY so...I bought plain, navy blackout curtain panels and added my stars without one stitch!
Almost any plain, white fabric will do. I used a white poplin, but you could use old sheets, old curtains, tablecloths, etc. I traced my template onto HeatnBond's iron on adhesive. After tracing and cutting out the pattern (leave at least an inch extra around the sides) iron onto the fabric. Then cut out the shape exactly on the lines. Now repeat that process a thousand times! Not really, but I needed 20 stars for my panels, and it felt like 100.
I folded my curtain in half by length and width so I could find the exact center, and I marked it with a sticker (top right).
Open the curtain and spread it on a flat surface. I chose to iron my curtains on the floor with a quilt underneath so I could see the whole thing at once. I think it would have been too hard to do it on an ironing board.
Peel the backing off the star and place adhesive side down and iron. It takes a little while, but I didn't want to damage my curtains with a too hot iron.
I cut my stars in half with a paper cutter. I tried scissors at first, but it did NOT go well.
I used 5 rows of stars per curtain: 3 rows of a whole and two halves and 2 rows of two whole stars. I needed 20 whole stars in total. Place one whole star in the center of the row, cut one star in half and place the halves along the edges.
I chose to place the top, center and bottom three rows first and then went back and added the two middle rows.
All done! I'm trying to wrap up some other projects in his room, and then I hope to share Little Man's new big boy room.


They are ADORABLE! Thank you for linking to The Yellow Cape Cod and for the shout out. I love your sons room! Sarah
ReplyDeleteWhat a terrific idea, and I bet you could adapt it for all sorts of shapes! I imagine it would be quite fiddly if you were using smaller patterns or shapes, but for these big bold shapes (which would be hard to find in a bought material) then it's ideal. Hope your son loves them!
ReplyDeleteLucy Andrews @ Safeclean Westminster