Thursday, August 20, 2015

Batter Up Dresser


If ever a project made me want to hang up my DIY gloves forever, this was it. It was so much more work than I anticipated, but a lot of it was my own fault. I paid $20 dollars for an ugly, horribly painted dresser and I poured hours of work into it. I spent more time than I can remember sanding this monstrosity down and getting rid of the thick, lumpy black paint that someone had slapped on it.


Then I painted it a solid off white. I paint furniture with a roller brush whenever possible. It goes on faster and looks better. 

Since this was going to be a baseball themed dresser for a little boy's room, I didn't think the scalloped piece at the bottom was appropriate. I knocked it off pretty easily with a hammer. Later I replaced it with a solid board, and it definitely looked more masculine. 


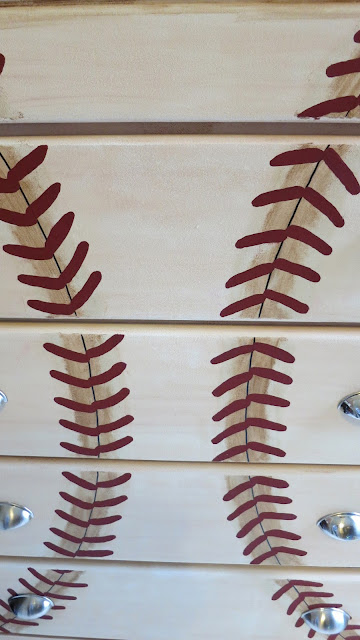
I wanted the end product to look like a well used, grungy baseball. I used Trewax (because I had it on hand. Anything similar will do) in Indian Sand color to help achieve that look. I applied it in streaks and then rubbed it with a cloth to help get the effect I wanted.  


I layered Old English over that to add a brown tinge over the red. 


I've said it before on this blog, but I am not an artist. I was so worried about how I would get the curved lines for the baseball seams. Such an easy solution! I pulled a hula hoop apart, and taped it in place and traced around the curve. Viola! 


I know it's difficult to see, but there are fine pencil lines on the drawers. Because the edges of my drawers were rounded, I taped them off. There is no possible way (for me anyways) to paint straight lines over curved edges. I know this because I tried, and I had to paint over it, re-age/distress and start again! 


Then I used brown acrylic craft paint over the lines and used a cloth to spread it out a couple of inches on either side of my penciled line. (this gives more dimension to the laces) 

Then I CAREFULLY traced over my pencil line with a black paint pen. 

I cannot overstate how difficult it is for me to paint...anything! I tried doing the laces free-hand, but had to start over. These stamps (I use the term loosely) were just cut out of craft foam. I used them to stamp the burgundy acrylic craft paint onto the drawers. Then I went back over them with a paint brush to fill them in. It was labor intensive. 


 Once I was done with that, I took the same brown acrylic paint and used it to "dirty" up the edges. 


I just put the old knobs back on when I was done, but I'll probably replace them somewhere down the line.


Sunday, July 5, 2015

Star Spangled Curtains


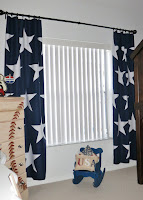
While searching Pinterest for inspiration for Little Man's All American Boy Room I stumbled upon a picture of star curtains by The Yellow Cape Cod. Click here to see her post. I fell in love with them! I searched online to see if I could buy something similar, but I couldn't find anything I liked as much. I cannot sew, and these were a semi-DIY so...I bought plain, navy blackout curtain panels and added my stars without one stitch! 

Almost any plain, white fabric will do. I used a white poplin, but you could use old sheets, old curtains, tablecloths, etc. I traced my template onto HeatnBond's iron on adhesive. After tracing and cutting out the pattern (leave at least an inch extra around the sides) iron onto the fabric. Then cut out the shape exactly on the lines. Now repeat that process a thousand times! Not really, but I needed 20 stars for my panels, and it felt like 100. 


I folded my curtain in half by length and width so I could find the exact center, and I marked it with a sticker (top right). 

Open the curtain and spread it on a flat surface. I chose to iron my curtains on the floor with  a quilt underneath so I could see the whole thing at once. I think it would have been too hard to do it on an ironing board. 
Peel the backing off the star and place adhesive side down and iron. It takes a little while, but I didn't want to damage my curtains with a too hot iron. 

 I cut my stars in half with a paper cutter. I tried scissors at first, but it did NOT go well.

I used 5 rows of stars per curtain: 3 rows of a whole and two halves and 2 rows of two whole stars. I needed 20 whole stars in total. Place one whole star in the center of the row, cut one star in half and place the halves along the edges. 

I chose to place the top, center and bottom three rows first and then went back and added the two middle rows. 


All done! I'm trying to wrap up some other projects in his room, and then I hope to share Little Man's new big boy room. 


Saturday, June 20, 2015

Star Spangled Wreath!


Need a quick and easy wreath for the 4th of July? Well, this is about as quick and easy as it gets. I love my boxwood wreath. Like, LOVE it! However, I needed a patriotic wreath so I decided to add a little decor to this one to get what I wanted. The best part is that it all comes right off when the holiday is over. 


Happy 4th of July! 

Tuesday, June 16, 2015

From Shab to Fab!


I am a big fan of my local Facebook Yard Sale pages. (You should check to see what groups are in your area) I've had some really great success stories. This is one of them!
I had the good fortune to be on Facebook this past Saturday, when someone posted in two of the local groups that I follow. She said she was closing up her yard sale and anything left was free. It wasn't too far away, so my dear hubby went on an errand for me. He brought home this diamond in the rough.


It was tacky and dirty/dusty. I pulled out all the yucky, silk flowers and greenery. When I was done it was easy to see that the wires that ran up and down the sides had been bent and twisted to accommodate the plants. 


So, I pulled them out. It was easier than I thought it would be. 


I hosed it down with a water hose and wiped the whole thing dry. Not too bad. 


I'm not sure if I have found the "perfect" spot for it yet and I'm not digging the white candle in it, but those are both easy fixes. I love it, and it cost me absolutely nothing!  


Saturday, May 23, 2015

DIY Picket/Pallet Flag


This project was so intimidating to me. Probably the most intimidating project I've ever tried. How was I going to build the flag? How would I paint even lines? Where would I get a star stamp the right size? How would I stain it?!!!! If you feel the same way, rest assured that if I can do it, you absolutely can too. This could easily be made using pallet boards, but I'm not into tearing yucky boards with rusty nails apart, only to be surprised by termites in my house later. I went to Home Depot and bought picket fence boards...only $1.08 each! I bought three 36-inch stakes for the back (I think these were around $0.57). 

My original plan was to cut the 6 ft picket boards down, and get rid of the tips on the ends, but once I had them all together I kind of liked the way it looked. It reminded me of the end of a flag waving. When you attach the stakes to the boards (I used #6 x 1" wood screws) make sure you have it flipped backwards, because when you turn it over, you want the "wavy edges" to be on the right. 


I painted the whole flag white so I wouldn't have to tape off and paint red stripes and then white stripes. This saved me a step. Since I wanted my end product to look aged and rustic, I only white-washed the flag instead of painting it a solid white (for those that don't know, whitewash is just watered down white paint). 

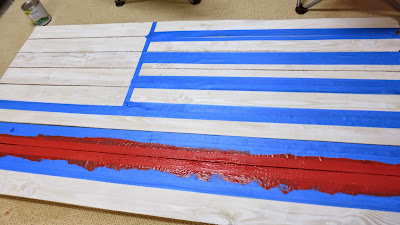
I'm not paid to do product placement, but I had to share a picture of this Shur-Line pack. It was amazing! Just what I needed to paint the stripes. I didn't want to use a paintbrush, because the wood was so rough that the painter's tape wasn't sticking perfectly. I didn't want the paint to bleed under the tape. This pack was an enormous help! 

The American flag has thirteen stripes, so you have to divide your flag into 13. An easy task in theory... I ended up leaving my bottom stripe a little bigger than the rest to make measuring easier. The blue field is a little less than 1/3 the width of the flag. 
 Make sure you apply the paint starting on the tape and swiping inwards, do not start in the middle of the stripe and brush out...you will get all kinds of paint under the tape. 
And even if you are super careful, you will probably have a few mistakes that have to be tweaked later. 

Anyone see my mistake below? I ended the blue field on a red line...it has to end on a white line. I tried to live with it, but I couldn't. After this point I had to go buy more boards, re-whitewash, re-tape and repaint! I was not a happy camper, but my OCD was:) 

I was so worried the whole time about how I would do the stars. I looked for stamps, stencils, etc. I couldn't find what I needed. I bought a cheap pack of  wooden stars (probably less than $3) at JoAnn Fabrics and tried out the different sizes to see what worked best for me. After I chose a size, I cut out lots of the same stars on paper and placed them on the flag so I could double check their size.  

But what to do about a stamp?! There was no way I could paint those stars by hand, a stencil would bleed through and a sponge would leave paint bubbles! I bought a 6mm foam sheet and used my wood piece for a template. I tried to cut out the star with scissors repeatedly before switching to a razor blade - much better! 
Then I used Gorilla glue to glue on a wooden cut out that was the same size, and another one over that so I could have something to easily grab. 

TaDa!
Trial and error came into play here. My first three stars had way too much paint on the stamp and did not look good at all! So I wiped them off, used way less paint and tried again. Since I was going for a rustic look/feel, I was fine with my stars being spotty and imperfect. 


Phase 1 - complete! 

In order to get the rustic look I was going for, I took  my sander to it....repeatedly! It was slightly terrifying. After all my hard work, there I was messing it up. It did give me exactly the look I wanted though. 
Here is Little Man showing off his new flag! I wanted to show how big it actually is. Little man is 3 feet tall (at least he was. I should probably measure my growing boy more often). This is hanging in his new big-boy room (a work in progress). The theme is All American Boy, but since the furniture will be dark walnut this was just too bright and light to match. 


I wanted to darken/age/rough it up, but was super nervous about what to use: stain, wax.....Agh! Too many choices! Someone recommended Old English scratch cover, and I had also seen it used on Pinterest. It was perfect. Though I will say easy does it. Go slow. Wear gloves so it doesn't stain your skin/nails! I dabbed the cloth in the Old English and dabbed/rubbed it on and then wiped it off. It gave me exactly the look I was going for. 


Finished! I'm so happy my All-American boy will grow up playing and sleeping with Old Glory flying over him.